|
UI Accessibility Plugin
Version 1.1.1
Make your UI accessible for visually impaired users
|
|
UI Accessibility Plugin
Version 1.1.1
Make your UI accessible for visually impaired users
|
This page provides How-To guides and solution for common problems and questions.
NGUI Support
Select Focus Item
Custom Navigation
Using Native Dialogs
Using Swipes in Gameplay
Grid based Puzzle Games
Icons instead of Text
Custom UI Element Order
Localization
Using Text-To-Speech
Custom Text-to-Speech plugin
Callbacks
3D UI Elements
The plugin supports NGUI, but support must be manually enabled.
Please read this page to learn how to set up UAP to work correctly with NGUI.
When opening any kind of menus, the plugin will automatically select the first element in the UI Group with the highest priority (if there is more than one UI group). From there the user changes the focus by swiping.
But you can manually set which item should be focused and provide a much smoother experience for the user by sensibly setting the focus point to a UI element.
You have two options to do this:
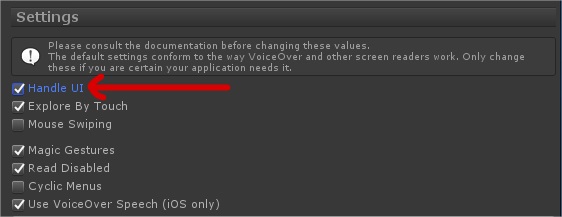
If your game implements a custom method of selecting UI elements and you don't want the plugin to use swipes or keyboard input and select UI elements automatically, you will probably only want to use the plugin to voice the currently selected element.
You can do so by disabling the automatic UI navigation in the plugin's settings, by disabling the 'Handle UI' checkbox.
|
You can then select your own UI elements like this: Select Focus Item
When opening a native dialog or system dialog, you will need to tell the accessibility plugin that is shouldn't react to touch input while the dialog is active. Otherwise the user will accidentally activate buttons and other UI elements while navigating the native dialog.
Call UAP_AccessibilityManager.BlockInput(true) when opening the native dialog, and call it again with a false parameter when it closes.
On Android you will need to tell your users to resume TalkBack. This is not needed on iOS, since VoiceOver works fine with Unity.
With the accessibility enabled, swipes are used to navigate the UI. But what if your gameplay needs to use swipes as well?
Instead of disabling accessibility completely, you can opt to just pause it instead. This will allow touch input directly through to your app instead - but it will still keep the TTS and the Magic Gestures intact.
Please see the documentation for UAP_AccessibilityManager::PauseAccessibility() for more information.
If your gameplay is based on a 2-dimensional grid, you might want to offer your players an alternative way of navigating the playing field.
Please take a look at the Match 3 Example and the documentation on how to set up 2D Navigation for your UI.
Especially in mobile applications the amount of actual text is usually kept to a minimum. Instead, apps rely heavily on the use of icons.
This reduces the amount of localization that needs to be done. It also uses less screen space and it makes the app usable by younger children who can't read yet.
Here are some examples:

|
To make images like these accessible, you can use the Accessible Label component. But since these images have no text labels for the Accessibility Plugin to read, you need to provide a name for them manually.
Please see here on how to do this: UI Element Names
Specifically for lives, virtual currencies, boosts and statistics, you can use the comfortable prefix function to add context to your displayed numbers without touching your code.
See Name Prefixes for more information.

|
Sometimes the automatic traversal order is not what feels natural, or provides the best usability. Sometimes the dimensions of a UI element cause the wrong order. In any of these scenarios you can provide a manual traversal order instead.
Read here on how to set that up: Manual Traversal Order
There's several parts to localization:
On app start, the plugin tries to detect the system's set language and sets it automatically.
To set the language for the plugin manually, call UAP_AccessibilityManager.SetLanguage(string language)
If the language is not supported, the plugin will fall back to English (or whatever language is first in the localization table - by default, this is English)
All the plugin's internal text phrases (such as 'double tap to select') are read from a localization table. This table contains English and German localization out-of-the-box and can be easily extended with more languages if desired.
The table can be found here:
UAP/Resources/UAP_InternalLocalization.txt
This is a tab-separated spreadsheet, which can be renamed to TSV and imported into Excel or Google Sheets. When you are done adding or changing languages, simply export as a TSV again, and rename the file extension to TXT.
UAP currently uses the default system voice for Windows SAPI, Android, MacOS and iOS.
The included Google TTS system currently always uses an en-US voice and does not support localization yet.
On iOS, if VoiceOver is used for speech output, the currently active VoiceOver voice is used.
On Windows, if NVDA is used, the currently active NVDA voice is used.
The voices used can not be chosen by the app.
All Accessible UI components offer the option to treat manually entered text as localization lookup keys.
This means the text will not be spoken directly as entered, but used as a lookup key to get a localized string back, which will then be read aloud.
|
When this option is checked, the plugin will call its internal function UAP_AccessibilityManager::Localize() before reading out the text.
NGUI: If you are using NGUI, the plugin will automatically use NGUI's internal localization system.
Unity UI: Unity doesn't have its own localization system, but you can hook the appropriate call to whatever plugin or system you are using on the function directly and return the localized result. This function is used for all localization calls, so you won't have to change any other code.
If everything is set up correctly, a preview of the translated text is displayed below the checkbox.
Note that this option is not available if the name text is read from a different label, as any such text would obviously already be localized.
You can always choose to fill in text into the name field of an accessibility component directly from the code.
That allows you to construct the content at runtime, and also to run it through your own localization system.
To do that, you can use the base class for all Accessible UI components: UAP_BaseElement.
Each class deriving from this has a "text" member which you can use to fill in the name text: UAP_BaseElement::m_Text
Sometimes you want to offer blind users additional information, since they can't grasp the entire view of the screen like a sighted user. You might want to announce the new total score after the player earned some points, or read out the remaining moves, or announce how many other cards of the same color are in the players hand.
Little efforts like these will make your game stand out in terms of accessibility!
You can use the Accessibility Plugin's Text-To-Speech system to read out this extra information for you. This will also make sure that the audio won't clash with any UI elements that are being read at the same time. Use UAP_AccessibilityManager::Say() to speak your additional feedback. Depending on the setting, you can have your output interrupt the current speech (if any), or wait and be queued. You can also determine whether you allow your text to be interrupted by the user (if he wants to skip it, for example).
The UAP plugin ships with native TTS for Android and iOS, and supports SAPI and NVDA on Windows computers, and VoiceOver on Mac.
On iOS the plugin can also use VoiceOver for speech output if it is running. On WebGL the plugin can connect to the Google Cloud TTS API if you provide an API key. See WebGL for more information.
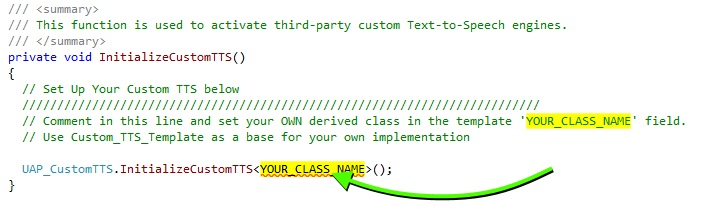
If you prefer to use a different TTS system, or use a different plugin for TTS, you can easily connect the plugin to use a custom TTS.
You need to implement a TTS interface class to connect your TTS plugin with UAP. This is very easy and usually takes less than 30 minutes if you already know how to use your TTS plugin.
Open the file UAP_AudioQueue.cs and navigate to the function UAP_AudioQueue::InitializeCustomTTS().
|
Apps can register for various callbacks with UAP, to be notified of important events.
These events include the starting and stopping of the plugin, or special multi-finger gestures.
Please see the page on Magic Gestures for a complete list of events and how to register for them.
Please see the demo scene '2D UI Example' inside the plugin's Examples folder.
 1.8.11